Integration
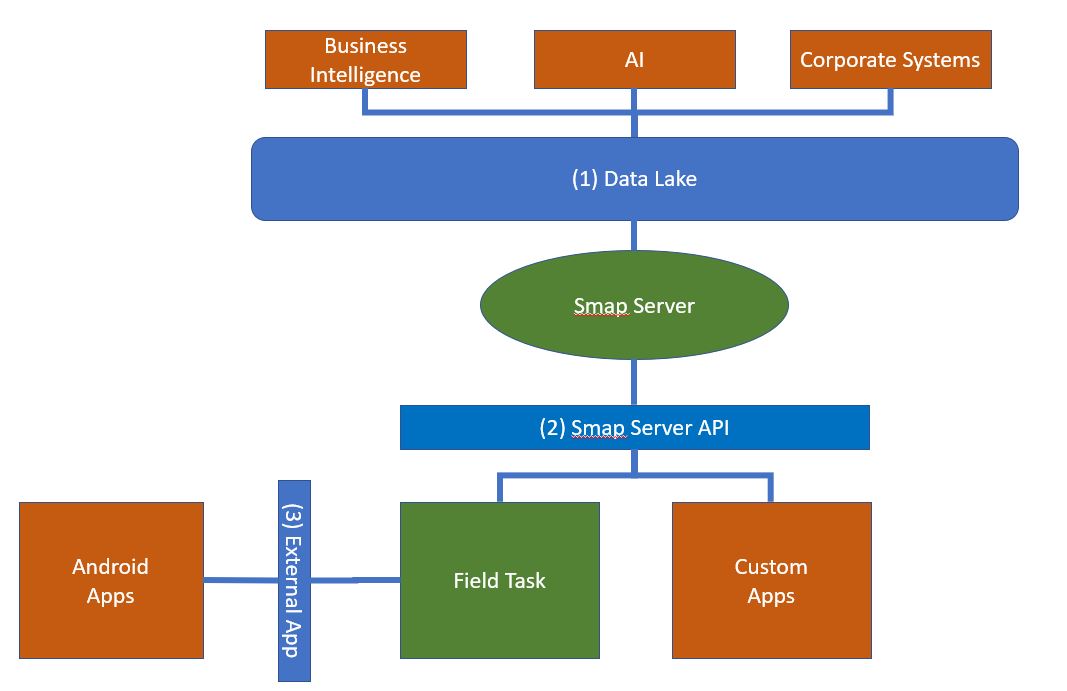
Applications built with Smap can be integrated with other applications in multiple ways. The following diagram shows the primary interfaces in blue. Typical external applications are shown in orange and the Smap components in green.
Integration
Data Lake
Data tables, images, video and other files collected using MDC can be pushed to a data lake where the data can be processed by data analytics tools pushed to other systems.
Smap Server API
Custom apps such as Progressive Web Apps, Native Mobile Apps or corporate systems can call this API to retrieve and update data. (Server APIs)
Android External App
From forms, running inside Field Task, external applications can be called to retrieve data. (Launching Apps from a Survey)
SharePoint
Requires SmapServer v26.05.01
Smap can write submission data to SharePoint lists and use SharePoint lists as shared reference data in forms.
Notification target — when a form is submitted, a trigger can insert or update a row in a SharePoint list.
Shared resource — a SharePoint list can be used as a source of reference data, accessible from forms using the
pulldata()andsearch()functions.
Supported versions
SharePoint Server 2019 (on-premises) — supported using S2S high-trust certificate authentication.
SharePoint Online — planned for a future release.
Server Configuration
SharePoint connection details are configured at the server level by a user with the server security group. Go to Admin → Users → Server tab and scroll to the SharePoint section.
Field |
Description |
|---|---|
SharePoint URL |
Base URL of your SharePoint server, e.g. |
Client ID |
The GUID of the app principal registered in SharePoint (see Registering the app in SharePoint (S2S High Trust)). |
Realm |
The SharePoint farm realm GUID. Use the Discover button to fetch this automatically from the server (no credentials required). |
Private Key (PEM) |
The PKCS8 private key used to sign authentication tokens. See Preparing the private key for preparation steps. |
Preparing the private key
The private key must be in PKCS8 unencrypted PEM format, beginning with
-----BEGIN PRIVATE KEY-----.
If you have a PKCS1 key (beginning with -----BEGIN RSA PRIVATE KEY-----),
convert it with:
openssl pkcs8 -topk8 -inform PEM -outform PEM -nocrypt \
    -in key.pem -out key_pkcs8.pem
Paste the full contents of key_pkcs8.pem into the Private Key field in the
server settings.
Notification Target: SharePoint List
A submission notification can insert or update a row in a SharePoint list whenever a form is submitted. See Notifications for general notification setup.
When adding a notification, select SharePoint List as the target. The following additional fields appear:
Field |
Description |
|---|---|
List Name |
The display name of the target SharePoint list, e.g. |
Operation |
Insert — adds a new row for every qualifying submission. Update — finds an existing row and updates it. Requires a match column and match field (see below). |
Match Column (update only) |
The SharePoint column used to find the existing row. |
Match Field (update only) |
The survey field whose submitted value is compared against the match column. |
Column Map |
A table mapping SharePoint column names (fetched from the live list) to survey field names. Add a row for each column you want to write. |
Note
Column names are fetched directly from SharePoint when you enter the list name, so the server connection must be working before you configure notifications.
Note
For update operations, if no matching row is found the notification will fail and an error will be recorded in the notification audit log.
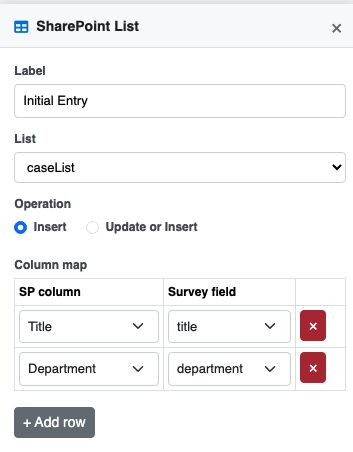
Specifying a notification to update a SharePoint list
SharePoint Lists as Shared Resources
A SharePoint list can be made available as a shared reference data source, accessible
from any survey in the organisation using the pulldata() and search() functions.
Setting up a SharePoint list mapping
Go to Admin → Shared Resources → SharePoint Lists tab.

SharePoint List Tab on the Shared Resources page
You can add, edit or delete SharePoint resources. Addition and edit open a dialog that allows you to set:
Field |
Description |
|---|---|
Smap Name |
The internal name used to reference the list in forms. Forms refer to
this resource as |
SharePoint List Name |
The display name of the list on the SharePoint server. |
Refresh Interval (minutes) |
How often the local cache is updated from SharePoint. Default: 60 minutes. |
Enabled |
Toggle to suspend syncing without deleting the mapping. |
Click Sync Now to force an immediate refresh. Click Show fields to see the data available in the SharePoint list.
Note
Data is cached locally. If SharePoint is temporarily unavailable, forms continue to function using the last cached copy.
Note
The cache holds up to 5,000 rows per list. Support for larger lists will be added in a future release.
DHIS2
Requires SmapServer v26.09
DHIS2 is the national health information system in many of the countries where Smap is used. It is built for aggregation, indicators and reporting. Smap is built for case management: assigning work to field staff, following it up and closing it, offline. The two solve different halves of the same problem and work better connected.
Data moves in both directions. Smap can use reference data held in DHIS2, so that a form collects against the client's own organisation unit hierarchy rather than a separately maintained copy that drifts out of step, and it can send submission data back to DHIS2 as aggregate data values.
Preparing DHIS2
Smap authenticates to DHIS2 with a personal access token (PAT). Before setting up the connection, create the token in DHIS2.
Use a dedicated service account, not a personal login
Create a DHIS2 user for the integration rather than generating a token from an administrator's own account. There are three reasons.
Two factor authentication blocks personal access tokens. DHIS2 refuses a token that belongs to an account with 2FA enabled, because a token bypasses the second factor. If a token from an administrator account is used the connection test fails with The API token is disabled, locked or 2FA is enabled. A service account without 2FA avoids weakening a person's login to make the integration work.
Attribution. Anything Smap writes to DHIS2 is recorded against the account that owns the token. A service account makes the DHIS2 audit trail describe the integration rather than name a person.
Revocation. The integration's access can be withdrawn without disturbing anyone's ability to log in.
Creating the token
In DHIS2, go to Edit profile then Personal access tokens and create a token. Note the following, all of which cause the connection to be refused with a 401 if set wrongly:
Setting |
Guidance |
|---|---|
Allowed HTTP methods |
GET must be permitted, for reading reference data. POST is also required if data is to be sent back to DHIS2. A token allowing only GET reads metadata perfectly well and then fails on export with Failed to authenticate API token, request http method is not allowed, which looks like a rejected token rather than a restricted one. |
Allowed IP addresses |
Leave empty unless you have a reason not to. DHIS2 validates the address from the
|
Expiry |
Tokens expire. Note the date, because the sync will begin to fail on it. |
Copy the token when it is shown. DHIS2 displays it once.
What the service account needs
Three separate things, and they fail in different ways. A token can be perfectly valid and every request still be refused because one of the other two is missing.
One user role. Give the account the Data entry clerk role, or any role granting the
Add/Update Data Value authority (F_DATAVALUE_ADD). That is the only authority the
integration needs. Reading organisation units, option sets, data sets and programs needs no
authority at all, because DHIS2 has no read authorities for those types: reading metadata is
controlled by sharing. Removing values needs no extra authority either, as there is no
separate delete authority for data values.
Without it, a send fails with Access is denied, requires one Authority from [F_DATAVALUE_ADD].
Note
Authorities are not assigned to users, they are assigned to roles, and users are given
roles. So the authority itself is only visible in Users then User roles, when
creating or editing a role, where it is listed under its name Add/Update Data Value
rather than its code. On the user's own Roles and groups screen you choose a role, not
an authority, which is why F_DATAVALUE_ADD cannot be found there.
Organisation units. Assign the data capture organisation units the account will write to. Assign the smallest subtree that covers them rather than the root. The connection test reports how many the account has, and no organisation units means every write fails.
Data sharing on what it writes to. This is the one that is missed most often, because the account can look fully privileged without it. Sharing has two halves, metadata and data, and they are set separately:
r w r - - - - -
│ │ │ └── data write        ← needed to send data
│ │ └──── data read
│ └────── metadata write
└──────── metadata read
In the Maintenance app, find the data set and choose Sharing settings from its menu. This is on the data set's own menu in the list, not inside the edit form. Add the account, or a group it belongs to, and give it Can capture and view data. Metadata access alone is not enough: without data access a send fails with Current user cannot enter data for data set.
Values that are disaggregated also need data write on every category option in the category combination, not only on the data set.
Note
The permission is really per data element rather than per data set. A data value is keyed by data element, period, organisation unit and category option combination, so the data set is not part of the key, and DHIS2 allows the write if the account can enter that data element through any data set containing it. A data element that appears in several data sets can therefore be written even when the data set named in the mapping is not shared with the account. Do not treat a data set as a security boundary.
Warning
A data set whose sharing has never been configured is writable by any authenticated user. Unset is the open state, not the closed one. It is worth checking sharing on the data sets a new service account can reach rather than assuming it is contained by default.
Setting up the connection
One DHIS2 connection is held per organisation. If you need to work against a test instance as well as a live one, set the test instance up in its own Smap organisation.
Go to Admin then Settings and select the DHIS2 tab.
Field |
Description |
|---|---|
Name |
A label for the connection, shown when a connection is referred to elsewhere. |
DHIS2 URL |
The root of the DHIS2 instance, for example |
Personal Access Token |
The token created above. It is stored write only: once saved it is never sent back to the browser, so the field is blank when you return to the page. Leave it blank to keep the token already stored, or type a new one to replace it. |
API Version |
Optional. Pin requests to a DHIS2 API version, for example |
Enabled |
Suspends the connection without deleting it. |
Click Test Connection to save and then check the connection.
Reading the connection test
The test reports more than whether the server answered. A connection can authenticate successfully and still be unable to do anything useful, so the test also reports:
the DHIS2 version and database name
the DHIS2 user the token belongs to
how many organisation units that user can capture data for
Warnings are shown when the account has no data capture organisation units, or does not report the authority to add data values. These are warnings rather than failures, because authority names differ between DHIS2 versions and an unfamiliar name should not block a working connection. They are worth resolving before relying on the connection.
DHIS2 option sets as choice lists
A DHIS2 option set can be copied and used as the choice list for a question, so that a form offers the client's own coded values rather than a separately maintained list.
Column |
Description |
|---|---|
|
The DHIS2 option code. This is the value to store in the form, because it is what DHIS2 expects and it does not change when an option is relabelled. |
|
The label to show to the user. |
|
The DHIS2 identifier of the option. |
|
The order the options are held in within DHIS2. Smap orders choices by a column of this name automatically, so the list appears in the same order as it does in DHIS2. |
Use it in a form the same way as any other shared resource:
search('dhis2_referral_reasons')
See Looking up Data for the search() function and Choices for
building a choice list from a shared resource.
Limiting the hierarchy
A national hierarchy can run to tens of thousands of organisation units. Where an organisation works in one region, set an organisation unit filter to the identifier of that subtree and only that part of the hierarchy is synchronised. Reducing the data at source is more effective than any transport optimisation, and it keeps the download to Field Task small.
Note
If DHIS2 returns no organisation units, the synchronisation fails and the previously cached list is left in place. An empty result is far more likely to mean a filter that matches nothing, or a change in permissions, than a hierarchy that has genuinely emptied, and the cost of accepting it would be every form losing its choice list.
Using the hierarchy in a form
Reference the resource in a form as dhis2_<smap-name>, the same way a SharePoint list is
referenced as sharepointlist_<smap-name>.
Cascading select — choose a district, then a facility within it:
search('dhis2_orgunits', 'matches', 'district_code', ${district})
Filtering by group set as well as hierarchy — clinics within the chosen district:
search('dhis2_orgunits', 'matches', 'district_code', ${district}, 'gs_facility_type', 'CLINIC')
pulldata() example — look up the name of a facility from its code:
pulldata('dhis2_orgunits', 'name', 'code', ${facility_code})
See Looking up Data for full details of the pulldata() and search() functions,
and Choice Filters and Cascading Selects for cascading selects.
Note
Store the DHIS2 code rather than the name. It is what DHIS2 expects when data is sent
back to it, and it does not change when a facility is renamed.
Sending data to DHIS2
Submissions can be sent to DHIS2 as aggregate data values, so that a monthly total collected in the field appears in the ministry's own reporting without anyone exporting a spreadsheet.
An export belongs to a survey bundle rather than to a single survey, because the surveys in a bundle share data tables, so a question name means the same thing across all of them. It is set up on the bundle settings page.
Field |
Description |
|---|---|
Data set |
The DHIS2 data set the values are written to, chosen from your instance. |
Period type |
Monthly, Weekly, Quarterly, Yearly or Daily. Match the data set. |
Period question |
The question supplying the reporting period. Leave blank to use the time the submission was uploaded. |
Organisation unit question |
The question holding the DHIS2 organisation unit code. Use a question whose choices come from a synchronised organisation unit resource, so the code is certain to resolve. |
Each value is then mapped from a question to a DHIS2 data element:
Setting |
Description |
|---|---|
Question |
The Smap question the number comes from. |
Aggregation |
Sum totals the answers for the period and organisation unit. Count counts the submissions. One takes a single value where one submission is one report. |
Data element |
The DHIS2 data element code. |
Category option combo |
Only needed where the data element is disaggregated. Leave blank for a data element using the default category combination. |
The mapping offers three actions:
Action |
Description |
|---|---|
Save |
Stores the mapping without sending anything. |
Dry run |
Sends the values to DHIS2 with nothing stored. DHIS2 validates everything and reports what it would have done, which is the only safe way to check a mapping before it writes into a reporting system. |
Send to DHIS2 |
Sends the values for real. Existing values for the same periods and organisation units are replaced. |
All three save what is on screen first, so a mapping can be adjusted and tried in one step. Always dry run before the first send.
Note
Re-sending a period corrects it rather than duplicating it. A DHIS2 data value is keyed by data element, period, organisation unit and category option combination, so submissions that arrive late are handled by exporting the period again.
Note
Values are visible in DHIS2 data entry immediately, but will not appear in dashboards or pivot tables until DHIS2 next generates its analytics tables. That is DHIS2 working as designed rather than the export failing, and it is the first question everyone asks.
The period may not be open for data entry
A DHIS2 data set controls how far ahead data may be entered, with a setting called open future periods. Where it is zero, which is the usual default, only periods that have ended can be selected in the DHIS2 Data Entry app. The month in progress cannot, so data sent for the current month is stored but cannot be seen there until the month closes.
This matters most for a form collecting cases as they happen, because everything it sends is for the period in progress. The values arrive, the Data Entry app offers only last month, and the export looks broken when it is working.
Two ways to tell the difference:
Ask the API instead, which is not restricted by the setting:
/api/dataValueSets?dataSet=<uid>&period=<period>&orgUnit=<uid>
Read what the send reported. A send that stored nothing says so.
Where a data set is fed continuously from Smap rather than by a monthly form, consider setting open future periods to 1 on the data set in DHIS2 Maintenance. The month in progress then becomes visible, which is what the people reading it expect.
Note
The restriction applies to data entry, not to the import. Sending values for a period beyond the open future periods succeeds; only viewing them in the Data Entry app is prevented.
Keeping DHIS2 up to date
Once a mapping has been proved with a dry run, there are two ways to keep DHIS2 in step without anyone pressing a button. They look like alternatives and are not: each covers what the other cannot, and using both together is the recommended setup.
Update as records change. Add a notification on the survey with DHIS2 as the target. There is nothing to configure on the notification itself, because what is sent is set by the mapping. Whenever a record is added, changed or deleted, the totals for the period and organisation unit that record belongs to are recalculated and sent.
This is the immediate one, and it makes several awkward cases ordinary. A correction, a record deleted in the console, a bulk update, and a submission arriving weeks after its period closed are all the same operation: recalculate that facility and period, send it, and DHIS2 now agrees with Smap. It is also the only mechanism that removes values from DHIS2.
Send automatically. Switch this on in the mapping and the export runs on its own, from the same background job that refreshes reference data. Set how often it runs, and how many recent periods to re-send.
Its real value is repair rather than freshness. A notification is sent once: if DHIS2 is unreachable, or the token has expired, the failure is recorded against the notification and that change is never sent again, leaving a stale total in DHIS2 that nothing will correct. The scheduled export re-sends its whole window on every run, so anything lost that way is put right on the next run, provided it falls within the periods being re-sent. Re-sending corrects rather than duplicates, so the overlap with the notification costs a batch of requests and changes no data.
Set periods to re-send wide enough to cover an outage you would not notice immediately. One or two periods is usually right for a monthly data set.
Notification |
Scheduled |
|
|---|---|---|
When |
Immediately on change |
Every interval |
What is sent |
The period and organisation unit that changed |
Every period and organisation unit in the window |
Removes values |
Yes |
No |
Recovers from a failed send |
No |
Yes, within the window |
Note
Deleting the last record for a facility and period removes the values from DHIS2 rather than leaving the previous figures behind. This happens only when a record has actually changed. A scheduled export that finds nothing leaves DHIS2 alone, because an empty result is far more likely to mean a broken mapping than a genuinely empty period.
Warning
A delete is the one operation the scheduled export cannot repair. If the notification for a deleted record fails to reach DHIS2, the values stay there and no later run will remove them, because the scheduled export never deletes. Check the notification log after any period in which DHIS2 was unavailable.
Two things to expect
DHIS2 will show partial periods. If the totals are updated as records arrive, a dashboard read in the middle of the month shows the month so far, and the figure rises as more submissions come in. That is the data being live rather than anything going wrong, but it is worth telling whoever reads the dashboards, because "the July number changed since I last looked" is otherwise a support call.
Updating on every record is one DHIS2 request per change. For a form receiving a few reports a day that is nothing. For one receiving thousands, it is thousands of requests, and the scheduled export is the better choice. A bulk update is not affected: the periods it touches are worked out first, so updating two hundred records in one facility and month is a single request.
What the aggregation can and cannot do
Counting and summing are deliberate limits. DHIS2 has indicators, program indicators and predictors of its own, so the useful division of labour is to send it the smallest raw numbers and let it derive the rest.
This means a form that collects totals, one report per facility per period, maps directly.
A form that collects one submission per case needs one more step, because a data element such as "malaria deaths" is a count of the cases matching a condition rather than a count of all of them. The condition goes in the form, not in the mapping.
Add a calculate that is 1 when the case matches and 0 when it does not, and map it
with Sum. Summing ones and zeros over a period counts the matching cases:
type        name                  calculation
calculate   c_malaria_death       if(${malaria_confirmed} = 'yes' and ${outcome} = 'died', 1, 0)
Use Sum rather than Count. Count would count every case, including the zeros.
Disaggregation works the same way. A data element split by age needs one calculate per category option combo, each testing the age as well as the condition, mapped to the same data element with a different combo.
Warning
Put the condition inside the calculation. Relevance is ignored on a calculate in Smap,
so a relevant expression on one has no effect and the calculate will be evaluated
regardless.
This is deliberate rather than a limitation to be worked around later. A form designer can already write any expression the form language allows, which is far more than an aggregation language invented for the export would offer, and the condition stays visible in the form where the rest of the logic lives.